There are so many hacks to running an aquaponics system. One of these is to make a homemade dutch bucket recirculating drip system which we will teach you all about in this article!
A homemade dutch bucket recirculating drip system is a clever method which funnels nutrient solutions directly to your plants’ roots. Any excess water then drains back into your water reservoir to be used again for later.
This method saves water and is said to be one of the most efficient ways to run an aquaponics system. Even though it might sound complicated, it is actually quite simple to set up. Once you take the time to build everything, you will need to do a lot less work in the future.
If saving time, money, and resources are your thing, then keep reading. We will tell you everything you need to know about a homemade dutch bucket recirculating drip system. You should leave this article ready to build!
What Is A Dutch Bucket?
Before we can get into details of this recirculating system, let’s make sure we are all on the same page. You may be wondering what exactly is a dutch bucket?
A dutch bucket gets its name because it was invented in the Netherlands as a way to move flowers around while keeping them watered. Essentially, it is a netted pot that fits into a larger bucket.
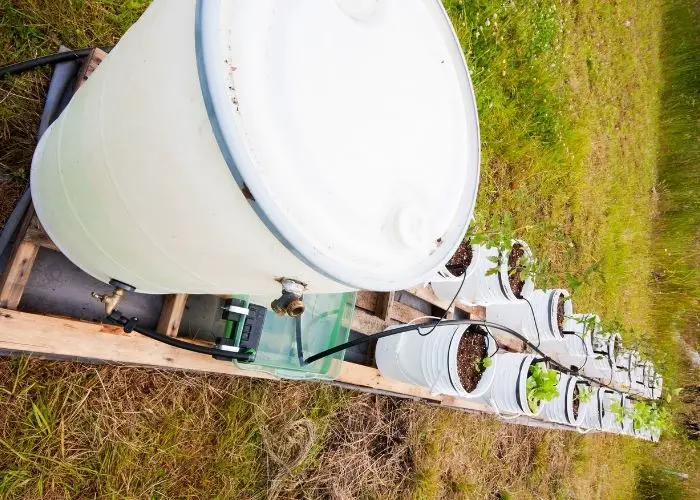
The first pot holds the growing medium and the second bucket contains the nutrient solution, which is pumped directly into the buckets.
Plant roots soak in that water directly and absorb all the nutrients from there. This method of growing is especially useful for those who want to grow high feeding plants.
High-feeding plants are those who require large amounts of nutrients to grow. Some vegetable varieties that are considered high feeding are eggplants, peppers, and tomatoes.
According to Upstart University, the dutch bucket method can be used in hydroponics or aquaponics systems. Either way, you will need to provide nutrients for your plants. In aquaponics, the nutrients will come from fish waste.
However, if you are doing hydroponics, you will have to add nutrients to your water by hand.
Another name for Dutch Bucket is Bato bucket. The thing that makes a homemade dutch bucket recirculating drip system unique is that the pipeline to water your plants is connected to the same drainage line.
The irrigation lines run across the top of the plants. The nutrient-rich solution is pumped to these irrigation lines which are connected between plant pots. At the bottom of the buckets, there is another pipe which is connected to the main drainage line.
This drainage line directs the extra water back into the reservoir. Everything is controlled by a pump and timer system, so it requires little maintenance.
Now let’s look at details of how to build a homemade dutch bucket recirculating drip system.
Find more information about How To Make A Garden Tower From A Barrel- Step By Step Guide
Steps To Making Dutch Bucket DIY
Doing a DIY (do it yourself) project is always rewarding. The nice thing is that making a dutch bucket DIY is very achievable.
First, you have to decide how many plants you want to grow. This will be determined by the size of space you have access to. If you are setting up this system outside, keep in mind the sun requirements for plants.
Tomatoes typically need at least 6 hours of sun a day. If you want to grow tomatoes, setting up your system in the shade will not work.
If you are growing indoors, you will need to supply artificial lighting. This will also limit the amount of plants you can grow.
In this case, let’s say you are going to grow 10 pots of tomatoes. Set up your bato buckets in a row right next to one another. Remember, in order for this to work, the pots need to be on the same line.
This is because you will be connecting the bucket drainage to a large PVC pipe which diverts the water back into the reservoir.
Fill the pot with a growing medium. A typical growing medium can be a mix of coconut coir and perlite. Since all the nutrients are being provided from the water reservoir, you do not need to use soil in your mix!
If you want to build your system hydroponically, you can use clay balls as your growing medium. The choice is yours.
Once your pots are filled, you can line them up in a row. Next, you will have to drill your drainage hole. For this type of system, one large drainage hole is best.
We recommend using a 2 inch PVC pipe as drainage from your bucket into the main drain pipe. Most important is to make sure you drill the appropriate holes for the pipe size.
Making Your Own Dutch Bucket System Continued
Your main drain pipe will span across all of your buckets. So make sure you buy the right length of piping needed for your project. Once you have set up your bucket drainage pipes, you can drill holes in your main drain.
Connect the pipes together. This main drain will have its exit where your water reservoir is.
Next, you will need to set up your drip irrigation emitters. If you go to a garden store, these are easily available. Explain your plan to the staff, and they will help you find the right sizes.
Your drip emitters will be connected to a pump that is sitting in the water reservoir. Set up your drip so that it goes directly into the bottom of the Bato bucket. Please note, you do not want to put the drip on top of your growing medium.
Once you do this, the only thing you have to focus on is coming up with a good timing system. Many people pump and drain four times a day. Ultimately it is up to you and your growing needs.
Hopefully, you leave this article knowing how to make a homemade dutch bucket recirculating drip system.
We are always here to help! Feel free to comment and ask questions below.